Getting Started
Getting Started
Enable Tri-Secret Secure on your Snowflake account with DuoKey XKS MPC
Overview
Snowflake provides a self-registration process for Tri-Secret Secure that uses a series of SYSTEM$ functions. This guide walks you through every step — from deploying your DuoKey XKS Proxy to activating TSS on your Snowflake account.
TSS Self-Registration Process
Step-by-step activation of Tri-Secret Secure with DuoKey XKS
Prerequisites
Prerequisites
- Snowflake Business Critical edition (or higher) on AWS
- ACCOUNTADMIN role in Snowflake
- DuoKey Cockpit access with XKS Proxy deployed
- DuoKey MPC Vault operational with at least one AES-256 key
- AWS account with KMS permissions in same region as Snowflake
- AWS CLI or Console access for KMS and IAM operations
Tri-Secret Secure is a significant security decision. Once activated, your Snowflake account depends on your CMK for all cryptographic operations. Ensure your DuoKey XKS Proxy and MPC Vault are production-ready with high availability before proceeding.
Step-by-Step Guide
Step 1: Deploy DuoKey XKS Proxy
Set up your DuoKey XKS Proxy with MPC Vault as the backend key manager. This step is identical to the standard DuoKey AWS XKS deployment.
- Deploy DuoKey XKS Proxy (public endpoint or VPC endpoint)
- Configure DuoKey Cockpit to route XKS requests to MPC Vault
- Create an AES-256 key in the MPC Vault for Snowflake CMK
- Verify XKS Proxy health check endpoint returns 200 OK
- Note the External Key ID assigned to your key
Refer to the AWS XKS Getting Started guide for detailed XKS Proxy deployment instructions.
Step 2: Create XKS-Backed CMK in AWS KMS
Create an AWS KMS key that uses your DuoKey XKS Proxy as its External Key Store.
-- 1. Create the External Key Store in AWS KMS (if not already done)
aws kms create-custom-key-store \
  --custom-key-store-name "duokey-xks-snowflake" \
  --custom-key-store-type "EXTERNAL_KEY_STORE" \
  --xks-proxy-uri-endpoint "https://your-xks-proxy.example.com" \
  --xks-proxy-uri-path "/kms/xks/v1" \
  --xks-proxy-connectivity "PUBLIC_ENDPOINT" \
  --xks-proxy-authentication-credential \
    AccessKeyId=AKIAEXAMPLE,RawSecretAccessKey=your-secret

-- 2. Connect the key store
aws kms connect-custom-key-store \
  --custom-key-store-id "cks-1234567890abcdef0"

-- 3. Create the CMK in the External Key Store
aws kms create-key \
  --origin "EXTERNAL_KEY_STORE" \
  --custom-key-store-id "cks-1234567890abcdef0" \
  --xks-key-id "your-external-key-id-from-duokey"
Record the Key ARN returned by create-key. You will need it in the next step.
Step 3: Register the CMK in Snowflake
Use the SYSTEM$REGISTER_CMK_INFO function to register your AWS KMS key with Snowflake. You must have the ACCOUNTADMIN role.
-- Switch to ACCOUNTADMIN role
USE ROLE ACCOUNTADMIN;

-- Register the CMK ARN
SELECT SYSTEM$REGISTER_CMK_INFO(
  'arn:aws:kms:eu-west-1:123456789012:key/mrk-1234abcd5678efgh'
);
| Parameter | Description | Example |
|---|---|---|
| Key ARN | Full ARN of your XKS-backed AWS KMS key | arn:aws:kms:eu-west-1:123456789012:key/mrk-... |
| Region | Must match your Snowflake account region | eu-west-1 |
| Key Type | Must be symmetric AES-256 encryption key | SYMMETRIC_DEFAULT |
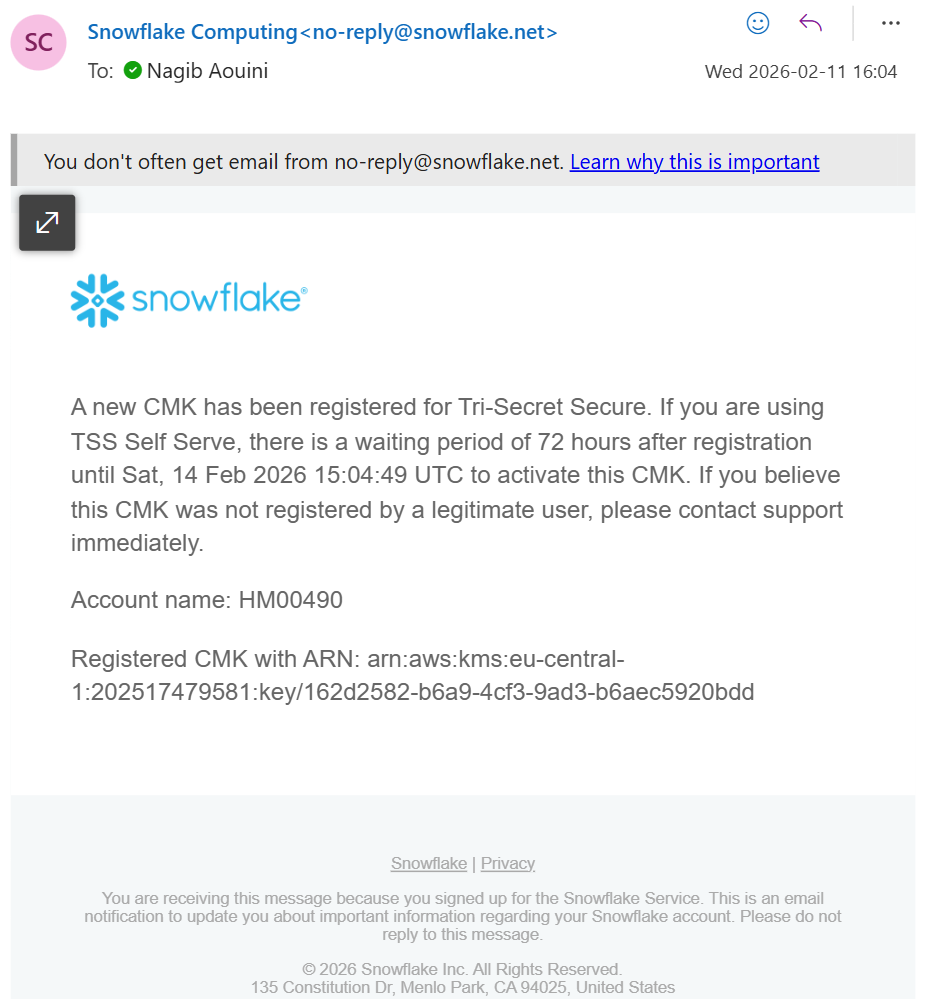
After registration, Snowflake sends a confirmation email with the CMK ARN and the 72-hour activation window:
Step 4: Get Configuration and Apply IAM Policy
Retrieve the Snowflake-specific configuration, then apply the IAM policy to your AWS KMS key so Snowflake can use it.
-- Get the required IAM configuration
SELECT SYSTEM$GET_CMK_CONFIG();
This returns a JSON document containing the IAM policy statement that must be attached to your KMS key. Apply it in AWS:
{
  "Sid": "AllowSnowflakeAccess",
  "Effect": "Allow",
  "Principal": {
    "AWS": "arn:aws:iam::SNOWFLAKE_ACCOUNT_ID:root"
  },
  "Action": [
    "kms:Encrypt",
    "kms:Decrypt",
    "kms:GenerateDataKeyWithoutPlaintext",
    "kms:DescribeKey",
    "kms:CreateGrant"
  ],
  "Resource": "*",
  "Condition": {
    "StringEquals": {
      "kms:ViaService": "snowflake.eu-west-1.amazonaws.com"
    }
  }
}
Apply the exact policy returned by SYSTEM$GET_CMK_CONFIG(). The principal ARN and conditions are unique to your Snowflake account.
Step 5: Verify Connectivity
Confirm that Snowflake can reach your CMK through AWS KMS and DuoKey XKS Proxy:
SELECT SYSTEM$VERIFY_CMK_INFO();
| Result | Meaning | Action |
|---|---|---|
| PASSED | Snowflake can successfully use your CMK | Proceed to Step 6 |
| FAILED — Key not found | AWS KMS key ARN is incorrect | Check ARN in REGISTER_CMK_INFO |
| FAILED — Access denied | IAM policy not applied correctly | Re-apply policy from GET_CMK_CONFIG |
| FAILED — Connection error | XKS Proxy unreachable or unhealthy | Check DuoKey XKS Proxy status |
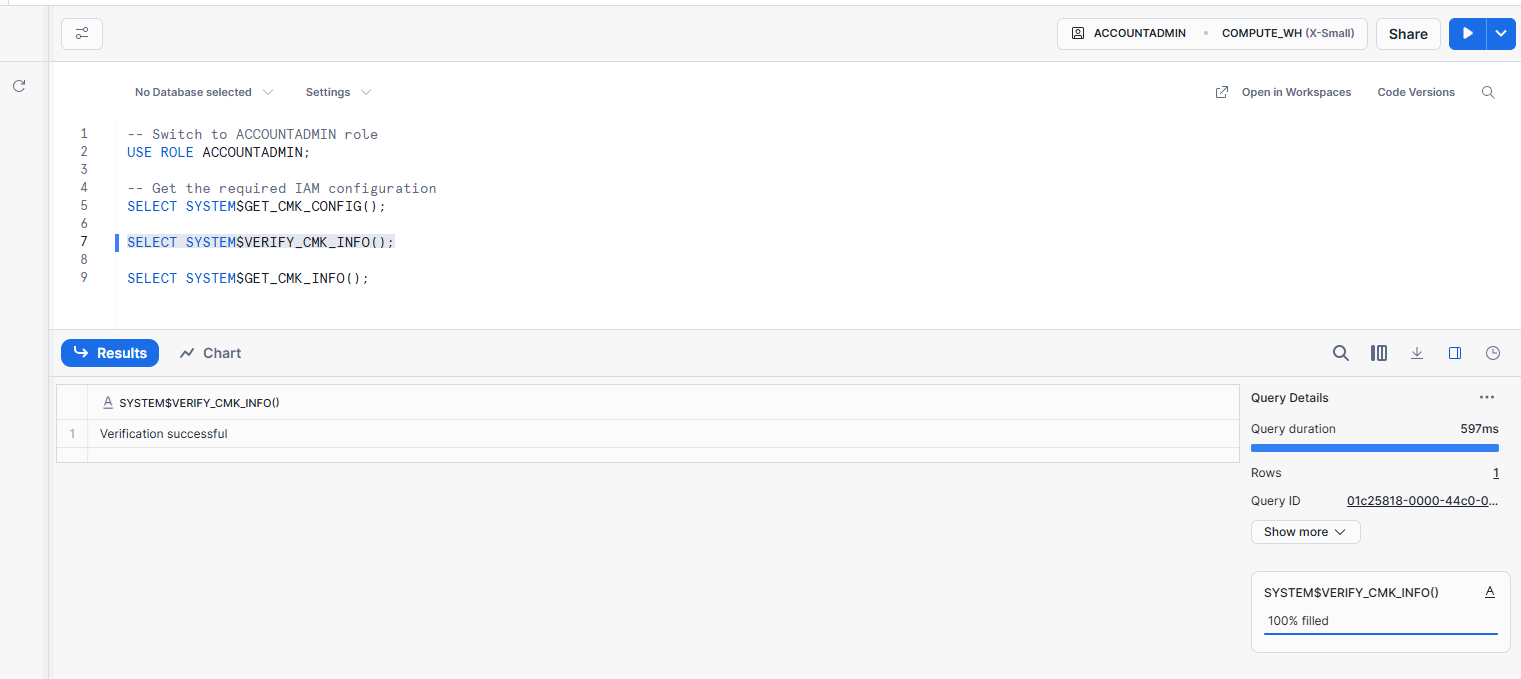
When verification passes, the Snowflake worksheet displays "Verification successful":
Step 6: Wait 72 Hours
Snowflake enforces a mandatory 72-hour waiting period between registration and activation. This is a safety measure to prevent accidental lockout. You cannot skip this step.
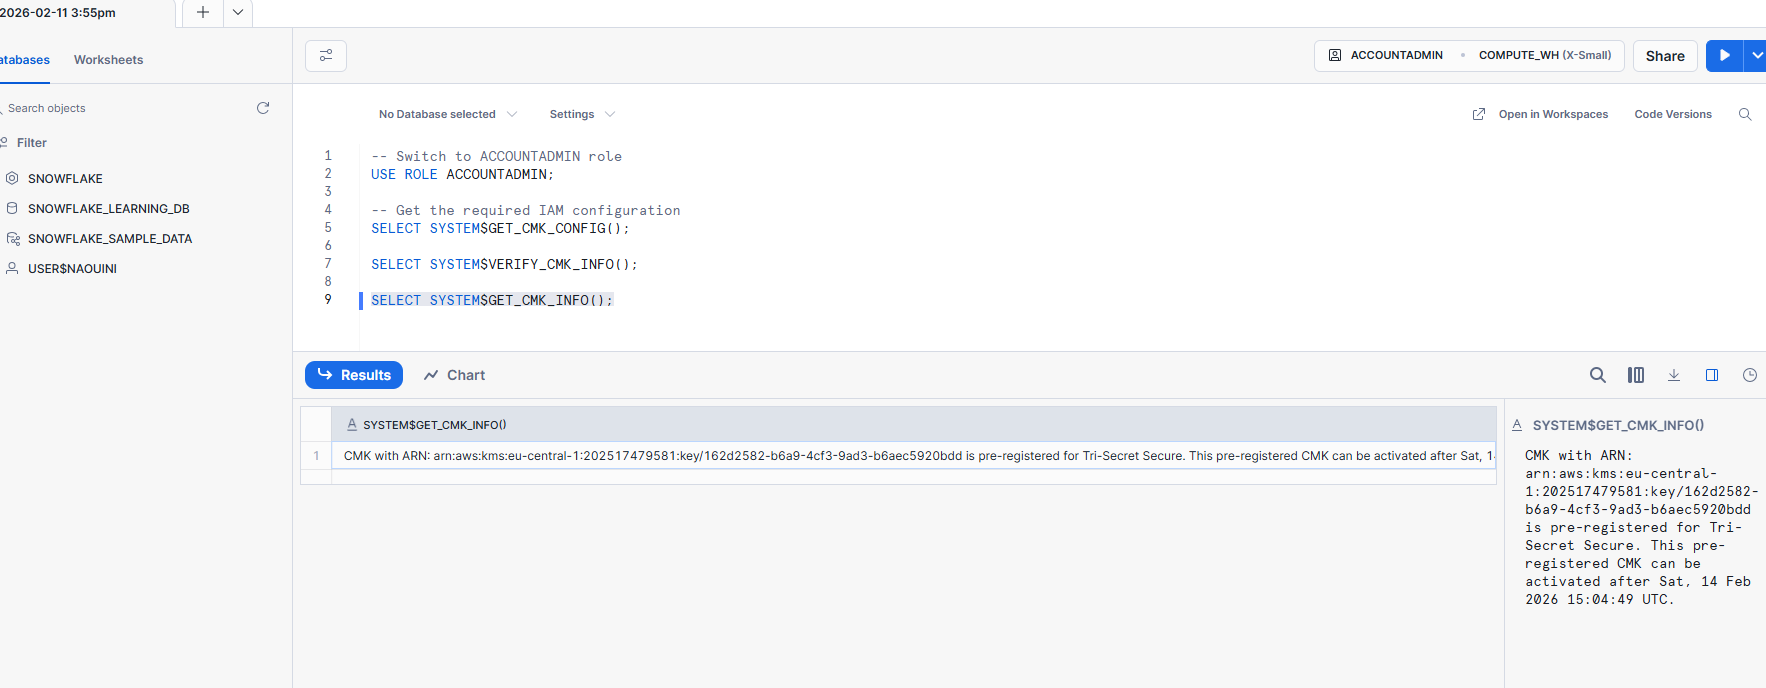
You can check the current status with SYSTEM$GET_CMK_INFO() — it confirms the CMK is pre-registered and shows the earliest activation date:
During the waiting period:
- Verify your DuoKey XKS Proxy is stable and monitored
- Test your key revocation and recovery procedures
- Ensure your operations team understands the TSS dependency
- Set up alerting for XKS Proxy health and latency
Step 7: Activate Tri-Secret Secure
After the 72-hour waiting period, activate TSS:
USE ROLE ACCOUNTADMIN;

SELECT SYSTEM$ACTIVATE_CMK_INFO();
The function returns: "Key rotation has started. Account admins will receive a notification email when rekeying is complete."
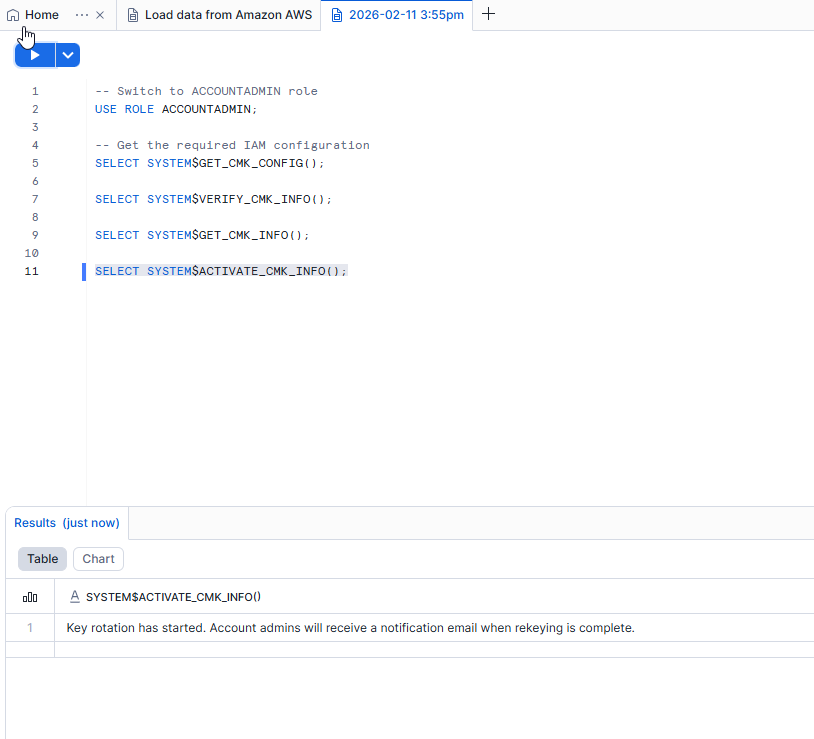
Snowflake worksheet showing the successful activation of Tri-Secret Secure via SYSTEM$ACTIVATE_CMK_INFO()
Once activated, Snowflake will begin re-keying all data with the composite master key. This process is automatic and transparent, but your CMK must remain accessible during the entire re-keying period.
Post-Activation
Once rekeying is complete, Snowflake sends a confirmation email confirming that Tri-Secret Secure is fully active and your account has been rekeyed with the activated CMK:
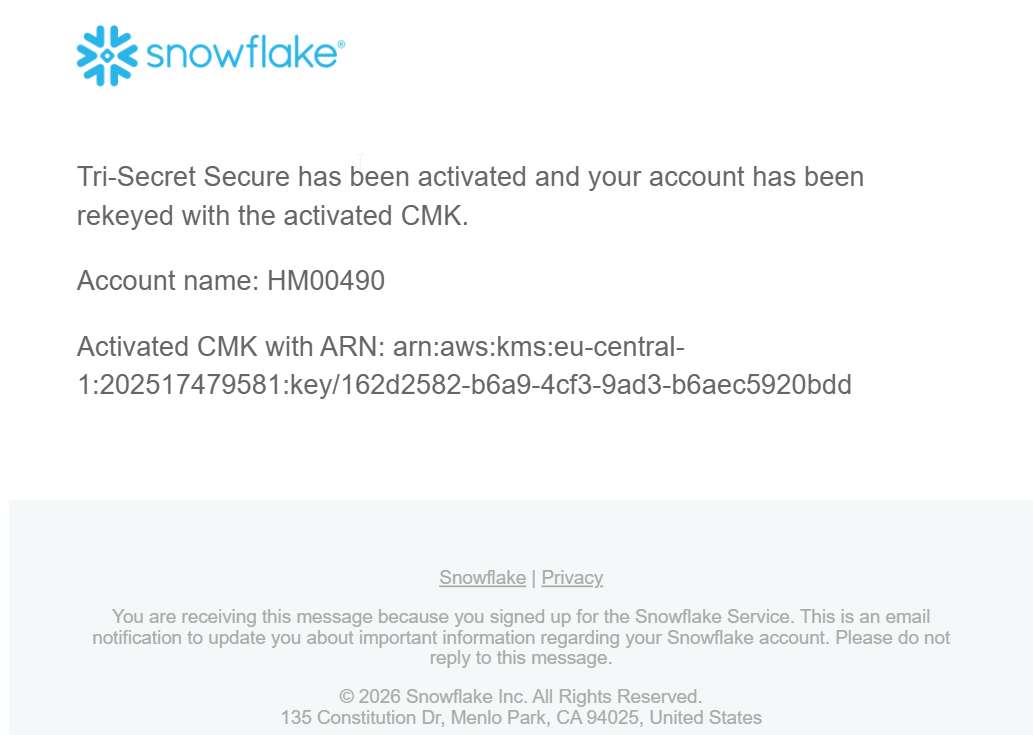
Confirmation email from Snowflake — TSS is activated and the account has been rekeyed with the CMK
Verify TSS Status
SELECT SYSTEM$GET_CMK_INFO();
After successful activation, the function returns: "CMK with ARN: arn:aws:kms:... is activated for Tri-Secret Secure":
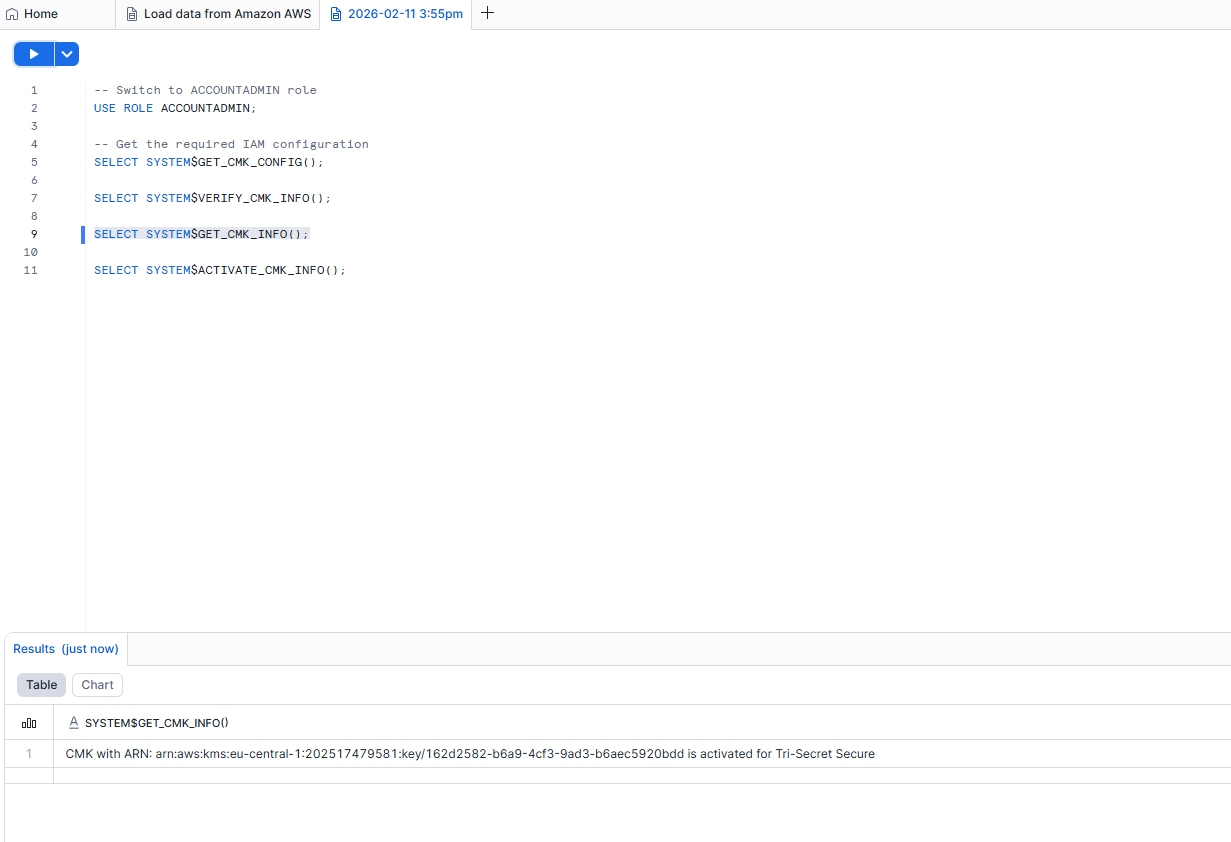
Snowflake worksheet — SYSTEM$GET_CMK_INFO() confirms the CMK is activated for Tri-Secret Secure
This confirms:
- The CMK ARN and region
- The activation status
- That Tri-Secret Secure is fully operational
Kill Switch in Action — XKS Proxy Disabled
One of the most powerful features of Tri-Secret Secure with DuoKey XKS is the ability to instantly revoke Snowflake's access to your data by disconnecting the External Key Store. Here is a real demonstration of what happens when the XKS Proxy is disabled.
Step 1: Disconnect the External Key Store in AWS KMS
From the AWS KMS Console, disconnect the External Key Store that links to the DuoKey XKS Proxy. The connection state changes to "Disconnected":
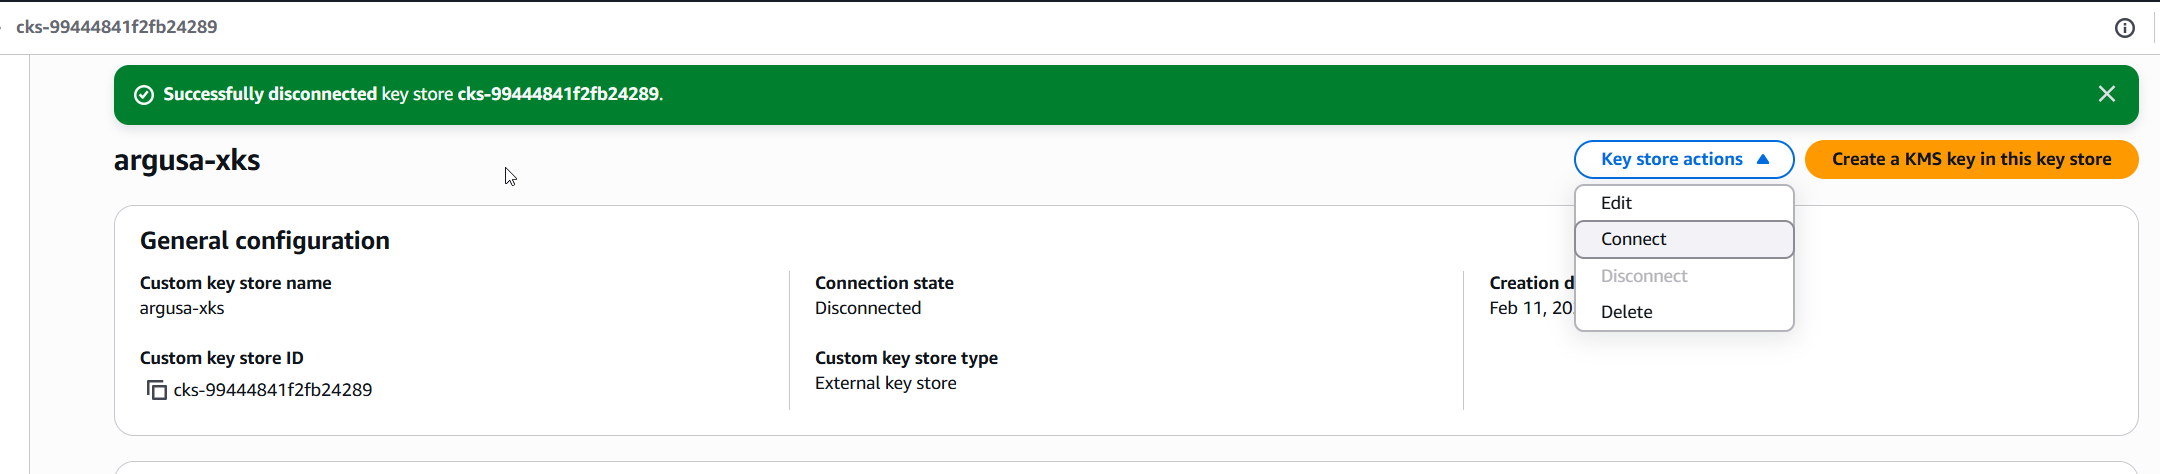
AWS KMS Console — the External Key Store is successfully disconnected, cutting the link to DuoKey XKS Proxy
Step 2: Snowflake is immediately locked out
With the XKS Proxy disconnected, Snowflake can no longer access the CMK. All data becomes completely inaccessible — users see an access denied error and cannot query any data:
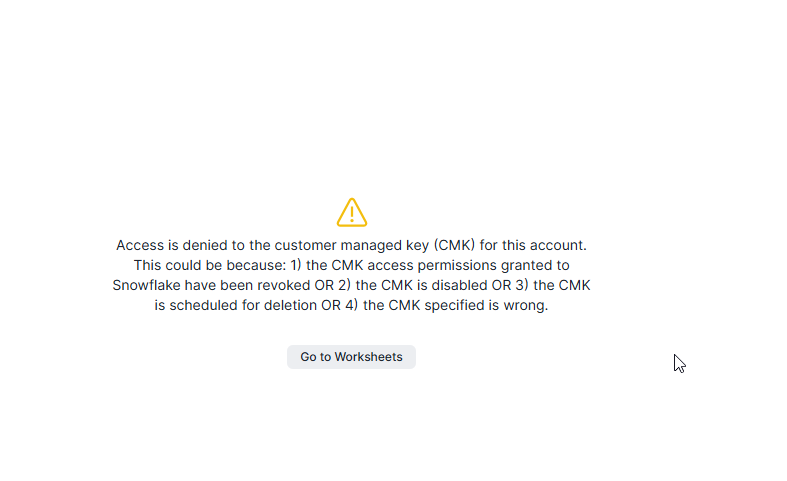
Snowflake is completely locked — "Access is denied to the customer managed key (CMK) for this account"
This demonstrates the true power of customer-controlled encryption: by simply disconnecting the XKS Proxy, you render all Snowflake data unreadable. No data deletion is needed — this is crypto-shredding in action. Reconnecting the key store restores access instantly.
Lessons from the 2024 Snowflake Breach: In mid-2024, attackers used stolen credentials to access 165+ Snowflake customer accounts (including AT&T, Ticketmaster, Santander), exfiltrating hundreds of millions of records. Had those customers enabled Tri-Secret Secure with DuoKey XKS, a single click to disconnect the External Key Store would have instantly locked out the attackers — making all data cryptographically inaccessible, exactly as shown above. See the full breach analysis for details.
Emergency Procedures
To immediately prevent Snowflake from accessing your data:
- DuoKey Cockpit: Disable the CMK key in DuoKey MPC Vault — instant effect
- AWS KMS: Disable the KMS key — takes effect within seconds
- AWS IAM: Remove the Snowflake IAM policy — takes effect within minutes
After revocation, Snowflake cannot generate new composite master keys. Existing cached keys will expire, rendering all data inaccessible.
Monitoring
| What to Monitor | Where | Alert Threshold |
|---|---|---|
| XKS Proxy health | DuoKey Cockpit | Any non-200 response |
| XKS Proxy latency | DuoKey Cockpit / CloudWatch | > 100ms average |
| KMS key status | AWS KMS Console / CloudTrail | Key disabled or pending deletion |
| CMK operations | AWS CloudTrail | Unexpected Decrypt or Encrypt calls |
| MPC Vault status | DuoKey Cockpit | Node offline or quorum lost |