okta
Okta Configuration
Configure Okta as an identity provider for DuoKey Cockpit
Overview
This guide walks you through configuring Okta as an identity provider for DuoKey Cockpit. Once configured, your users can authenticate to Cockpit using their Okta credentials with full support for Okta's adaptive MFA and security policies.
Prerequisites
- Admin access to Okta Admin Console
- Admin access to DuoKey Cockpit
- Your Cockpit domain URL (e.g., yourcompany.duokey.cloud)
- Your Okta domain (e.g., yourcompany.okta.com)
Part 1: Okta Configuration
Step 1: Create an OIDC Application
Navigate to the Okta Admin Console and create a new OIDC application.
Access Applications
Create App Integration
Select OIDC
Select Web Application
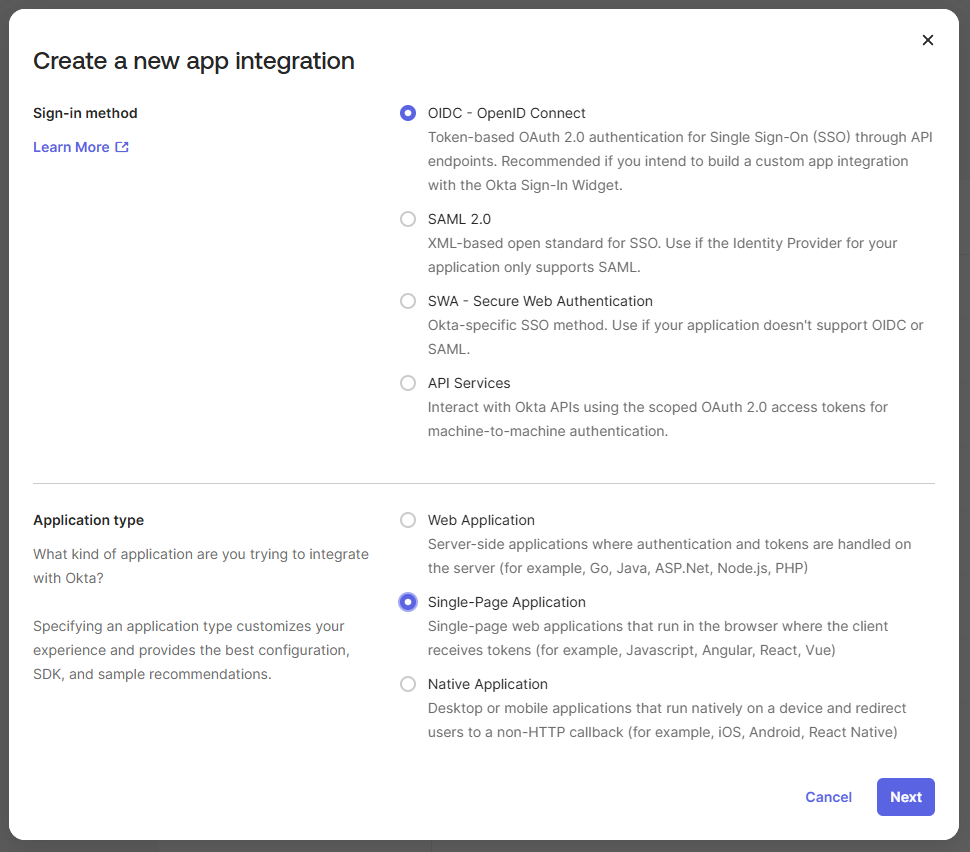
Step 2: Configure Application Settings
Configure the OIDC application with the following settings:
| Setting | Value |
|---|---|
| App integration name | DuoKey Cockpit (or your preferred name) |
| Grant type | Authorization Code |
| Sign-in redirect URIs | https://{yourCockpitDomain}/account/login |
| Sign-out redirect URIs | Optional |
| Controlled access | Based on your organization policy |
Sign-in Redirect URIs
Configure the redirect URI to point to your Cockpit login endpoint:
https://{yourCockpitDomain}/account/login
{yourCockpitDomain} with your actual Cockpit domain, for example: https://mycompany.duokey.cloud/account/loginIf you have multiple Cockpit environments, add all redirect URIs:
https://{yourCockpitDomain}/account/login
https://{yourCockpitApiDomain}.duokey.cloud/account/login
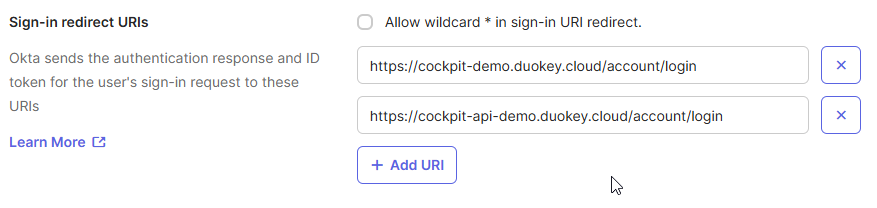
Step 3: Get the Client ID
After creating the application, note the Client ID from the General tab. You'll need this for Cockpit configuration.
Navigate to General
Copy Client ID
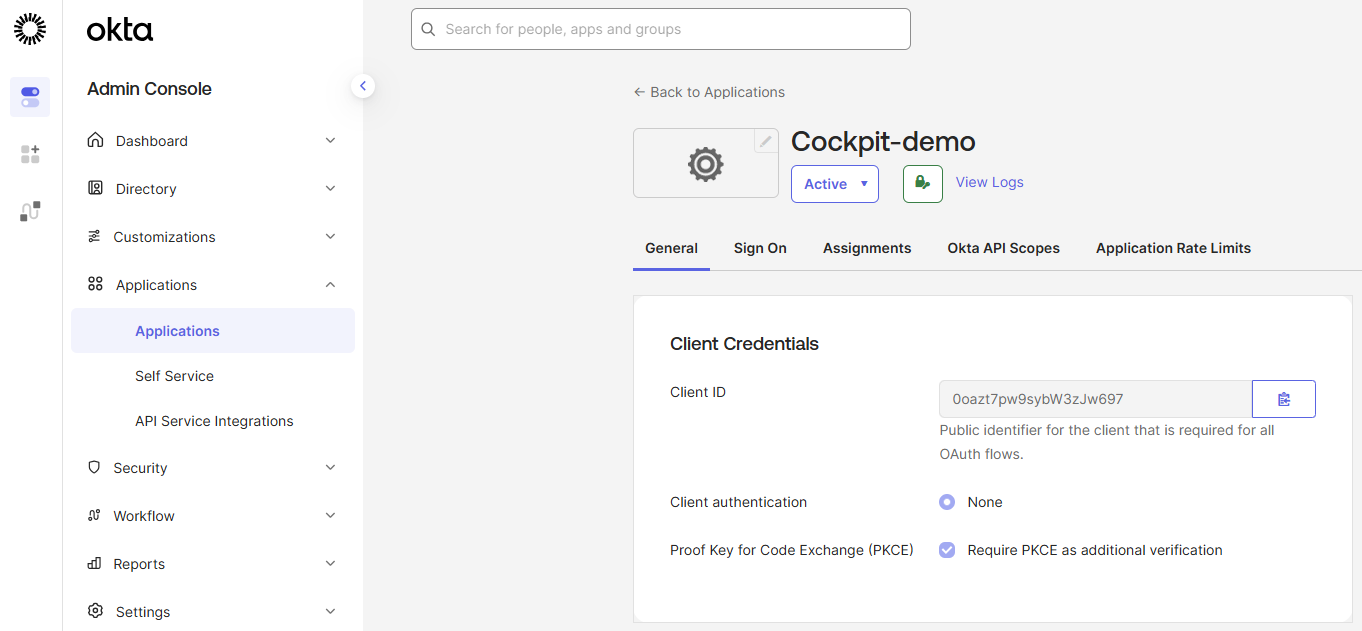
Step 4: Note the Well-Known Configuration URL
The OpenID Connect well-known configuration URL for Okta follows this pattern:
https://{yourOktaDomain}.okta.com/.well-known/openid-configuration
{yourOktaDomain} with your Okta subdomain. For example, if your Okta URL is https://mycompany.okta.com, your well-known URL is https://mycompany.okta.com/.well-known/openid-configurationPart 2: DuoKey Cockpit Configuration
Step 1: Access Identity Provider Settings
Login to Cockpit
Navigate to Administration
Create New IDP
Step 2: Select Okta
Select Okta from the available identity provider options and click Install Now.
Step 3: Configure Okta Connection
Fill in the configuration form with the values from your Okta setup:
| Field | Value | Description |
|---|---|---|
| Integration Name | Your preferred name | This name will be displayed on the login screen |
| Well-known Configuration | https://{yourOktaDomain}.okta.com/.well-known/openid-configuration | Other fields will be auto-populated |
| Client ID | Your Okta Client ID | From Okta application General tab |
Enter Integration Name
Enter Well-known URL
Enter Client ID
Step 4: Test the Connection
Click the Test Connection button to verify your configuration.
Click Test Connection
Verify Status
Troubleshoot if Needed
Step 5: Save and Enable
Submit Configuration
Enable the IDP
Step 6: Verify on Login Screen
Once enabled, the Okta login option will appear on the Cockpit login screen. Users can click the Okta button to authenticate with their Okta credentials.
Configuration Summary
| Component | Value |
|---|---|
| Okta App Type | OIDC Web Application |
| Grant Type | Authorization Code |
| Sign-in Redirect URI | https://{yourCockpitDomain}/account/login |
| Well-known Configuration | https://{yourOktaDomain}.okta.com/.well-known/openid-configuration |
| Protocol | OpenID Connect (OIDC) |
User Assignment in Okta
By default, Okta applications require explicit user or group assignment. Configure user access in Okta:
Go to Assignments
Assign Users/Groups
Save Assignments
Alternatively, you can enable self-service access or assign the app to everyone in your organization through Okta's assignment settings.
Troubleshooting
Okta provides detailed logs in System Log. If you encounter issues, check Admin > Reports > System Log for authentication events related to your DuoKey Cockpit application.
Security Best Practices
Enable MFA
Configure multi-factor authentication in your Okta Sign-On policies for enhanced security
Use Group Assignment
Assign the app to groups rather than individual users for easier management
Monitor Access
Review Okta System Log regularly for unusual authentication patterns
Session Policies
Configure appropriate session timeouts in Okta for your security requirements